
Have you ever tried to start a blog but given up along the way?
Starting a blog can be overwhelming but it doesn’t have to be.
My first blog I ever started was over 10 years ago and I remember how paralized I felt.
I knew I wanted to help people.
And blogging seemed like the best outlet to share my knowledge and a place to express my creativity.
But I kept on holding myself back and thinking I needed to get everything perfect.
Now I have been blogging successfully for a few years and started making money from it in 2019.
The excitement I felt when I made my first affiliate commission was like nothing else.
But what was more fulfilling was my readers reaching out to me saying that my content helped them in some way.
That’s priceless.
Now it’s my mission to turn my passion for helping people achieve their goals and dreams into a full time blogging business.
And I want to help you do the same.
So in this blog post, I’m going to show you how to start a WordPress blog without getting overwhelmed.
You’ll also learn how to choose a name for your blog and how to choose a topic to blog about.
Then later in this post I’ll share how you can start to make money with your blog and turn your passion into a business.
So, if you’re ready…
Let’s get started!
Table of Contents
What is WordPress?
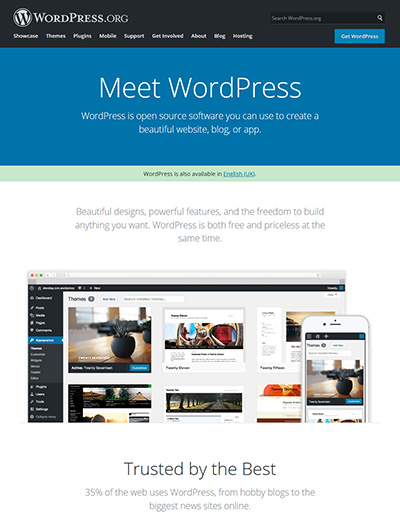
WordPress is a website and blogging platform that powers 37% of all websites on the Internet.
The reason why it’s so popular is because it’s so easy to use but very powerful.
It’s also free to use but you will need to invest in web hosting and a domain name. More on that later.
Whatever you need your blog to do, you can do it with WordPress.
Many blogging platforms tie you into single option upgrades that become expensive.
But not with WordPress.
WordPress often has many free options to choose from when you need to get more out of it.
And new bloggers can get started with minimal WordPress plugins and zero cost.
Then if you want to start selling things from your blog or collecting emails, you can do that as and when you need to.
Is WordPress Free… Like, How Free?
WordPress.org is completely free to use.
It’s used by millions of website owners and bloggers all over the world.
It’s a website and blogging platform that you download and upload to your web hosting account.
The only things you’ll need to launch your blog with WordPress is a web hosting account and a domain name.
Your domain name is the URL that people type into a browser to access your website and blog, like, “google.com”.
And web hosting is sort of like a computer that is always on and stores all of the files, images and pages that make up a website.
It’s super easy to set up, so let’s get straight to it!
If you already have a domain name and web hosting and want to add a blog to your WordPress website, follow the steps from here.
How to Get Web Hosting & Install WordPress
As mentioned, you’ll need web hosting to store WordPress and all the files, images and pages that make up a website.
And my favourite web hosting company is Cloudways.
I’ve been using them now for a few years for my client sites and my own.
Follow these steps below and you can setup WordPress on Cloudways in less than 10 minutes.
Let’s begin.
Install WordPress on Cloudways
One of the great things about Cloudways is how easy it is to install WordPress.
Cloudways also provide you with a private domain name so you don’t need to buy your own before getting started with Cloudways.
This is great if you’re using WordPress for the first time and you just want to play around with it or if you don’t know what to call your website or blog yet. I will help you decide on a domain name later in this article.
Follow this video tutorial to install WordPress on Cloudways in less than 10 minutes: (written steps are below the video)
Here are the steps to get your WordPress blog setup on Cloudways.
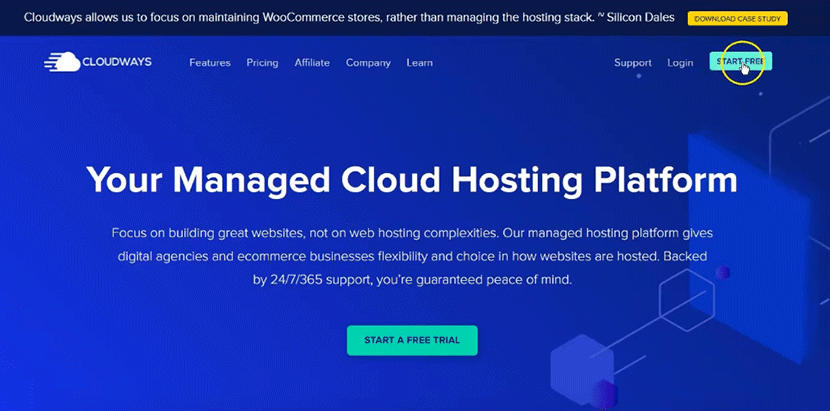
Head over to Cloudways.com and click Start Free:
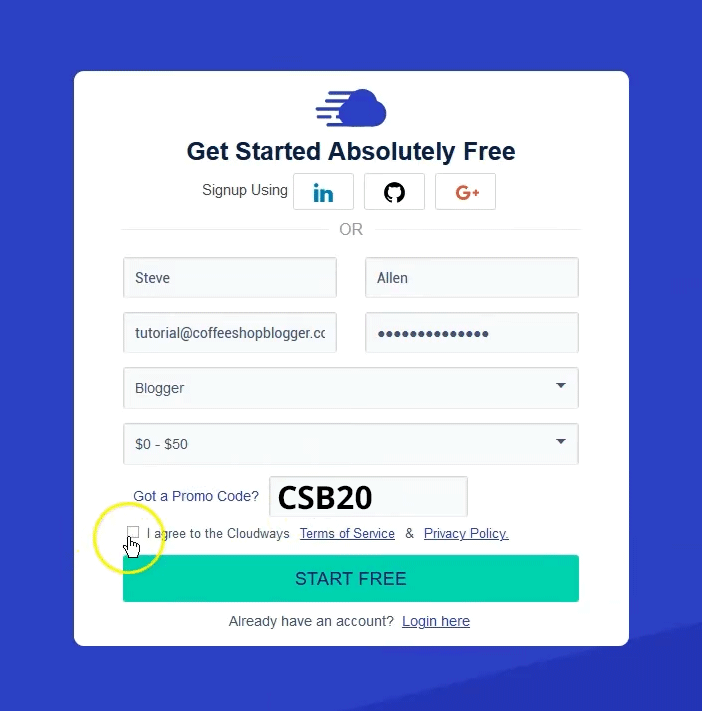
On the sign up page, use the Promo Code to get 20% off your first two months:
When you sign up to Cloudways for the first time, you get a 3 day free trial, but your WordPress installation will be deleted after the 3 days. You’ll need to activate and upgrade your account to prevent this deletion and continue building your WordPress blog.
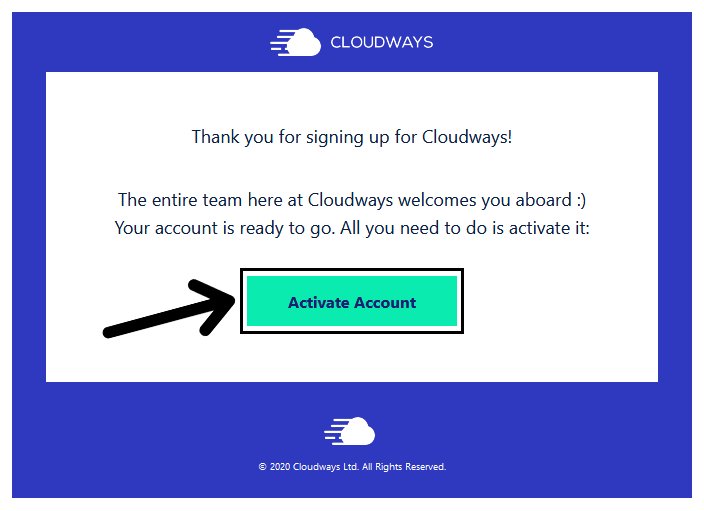
To activate your account, go to your email inbox and click on the activation link:
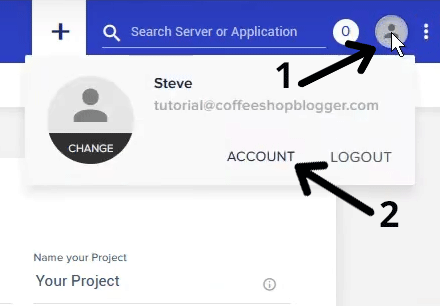
Then upgrade your Cloudways account by clicking on the user icon and click Account:
Now, click on Credit Card and Authorize Credit Card:
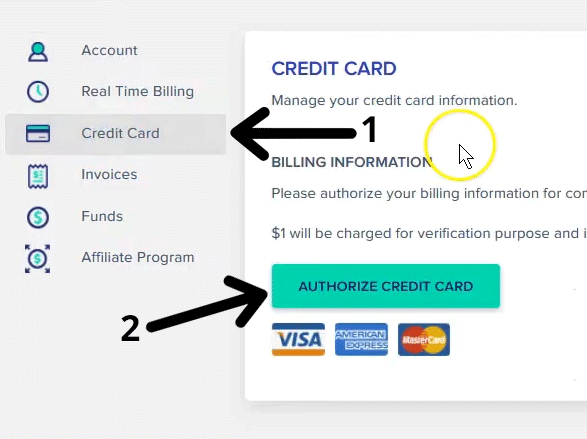
Fill out your card details and your account will be activated. You’ll only be charged $1 but it gets refunded to you. This is for verification purposes only.
There’s no upfront costs with Cloudways, you only pay for what you use at the end of each month. This means that if you only use Cloudways for a few weeks, it’ll only cost you a few dollars and you can cancel at anytime.
Now we’re ready to install WordPress.
Click on Servers and then click Launch:
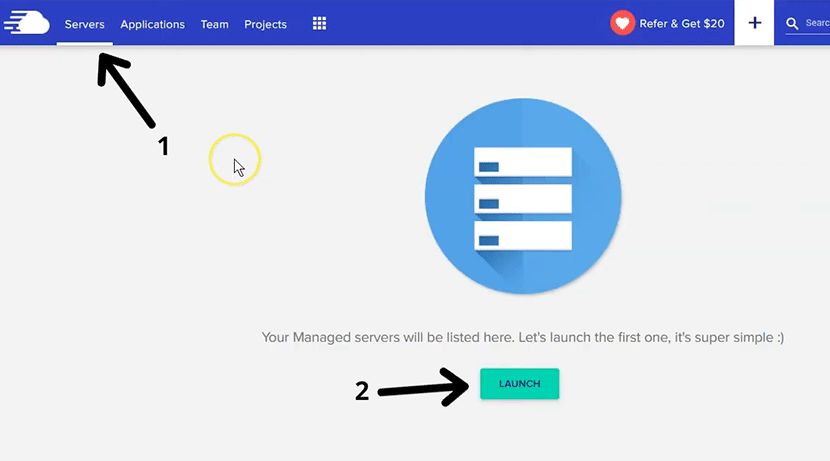
On the next page, you’ll see some options you need select and fill out:
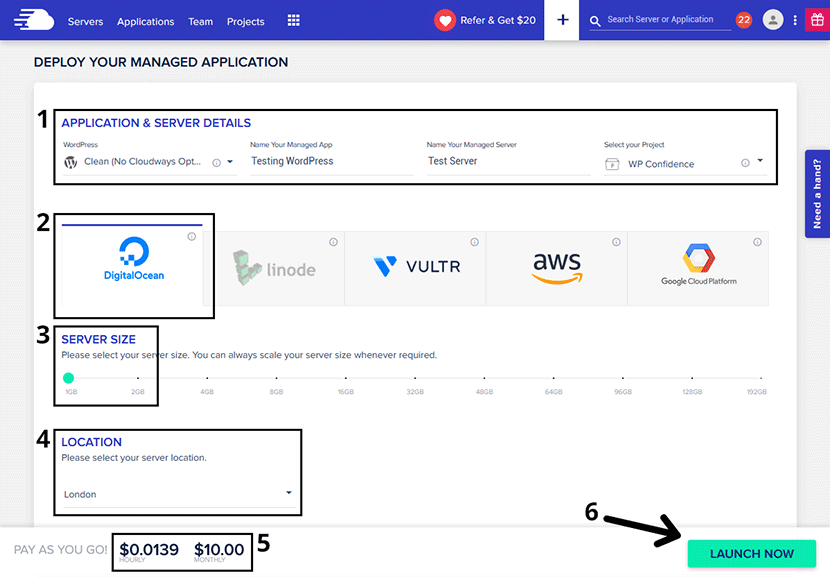
Here’s what they all mean:
- The Application is WordPress, so select WordPress (Clean) from the dropdown. Then enter a name for the App, Server, and Project. These names can be anything you like.
- This is the cloud platform where your WordPress files will be stored. Cloudways is the platform that manages everything for us. I always choose Digital Ocean because it’s the cheapest. It’s up to you which one you choose.
- As this is a new WordPress blog, you’ll only need 1GB for the Server Size. This can be upgraded easily in the future.
- Choose a Location closest to where you or your blog visitors live.
- This will be the price you pay per hour and the maximum per month.
- Then click on the Launch Now button.
Now Cloudways will get to work and create the server and WordPress installation automatically.
Once the installation is complete, you can access your WordPress website by clicking on the WWW and then on your Application Name:

You’ll then see your Application URL which will take you to the WordPress home page. And the section below is your WordPress admin URL and login details.
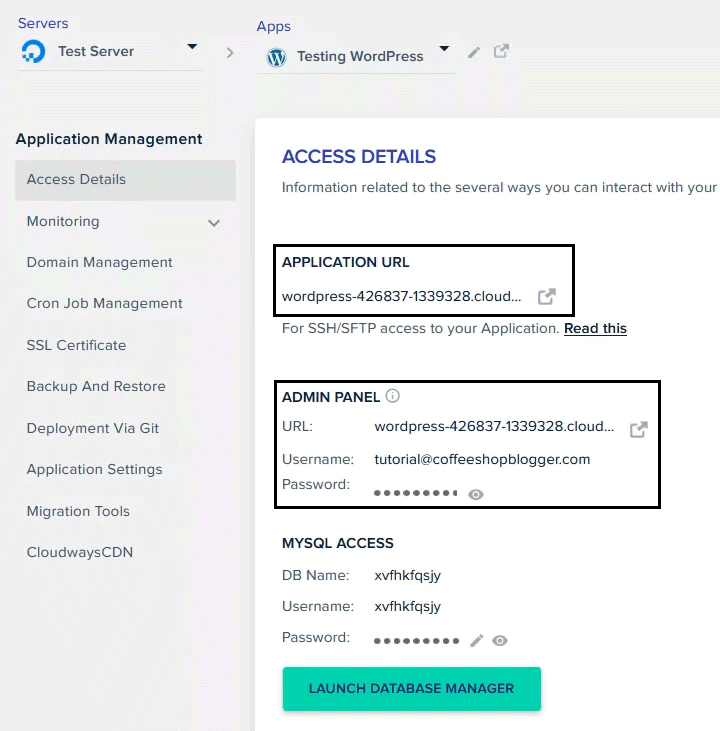
This URL is the private domain name I was talking about. You can use this domain name until you choose a name for your blog, I’ll cover this in the next section.
But for now, congrats! You have successfully installed WordPress on Cloudways!
Here’s what it currently looks like:
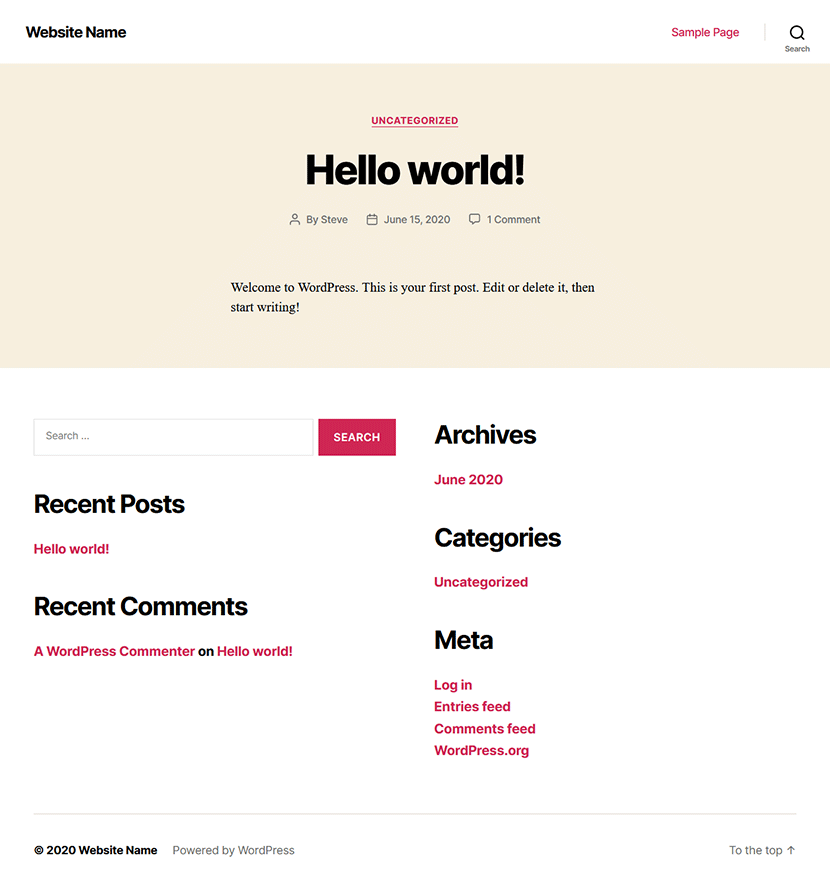
This is the default WordPress theme which we’ll change later on in this post.
And in a different post, I’ll show you how to design this cool and simple minimal blog design:
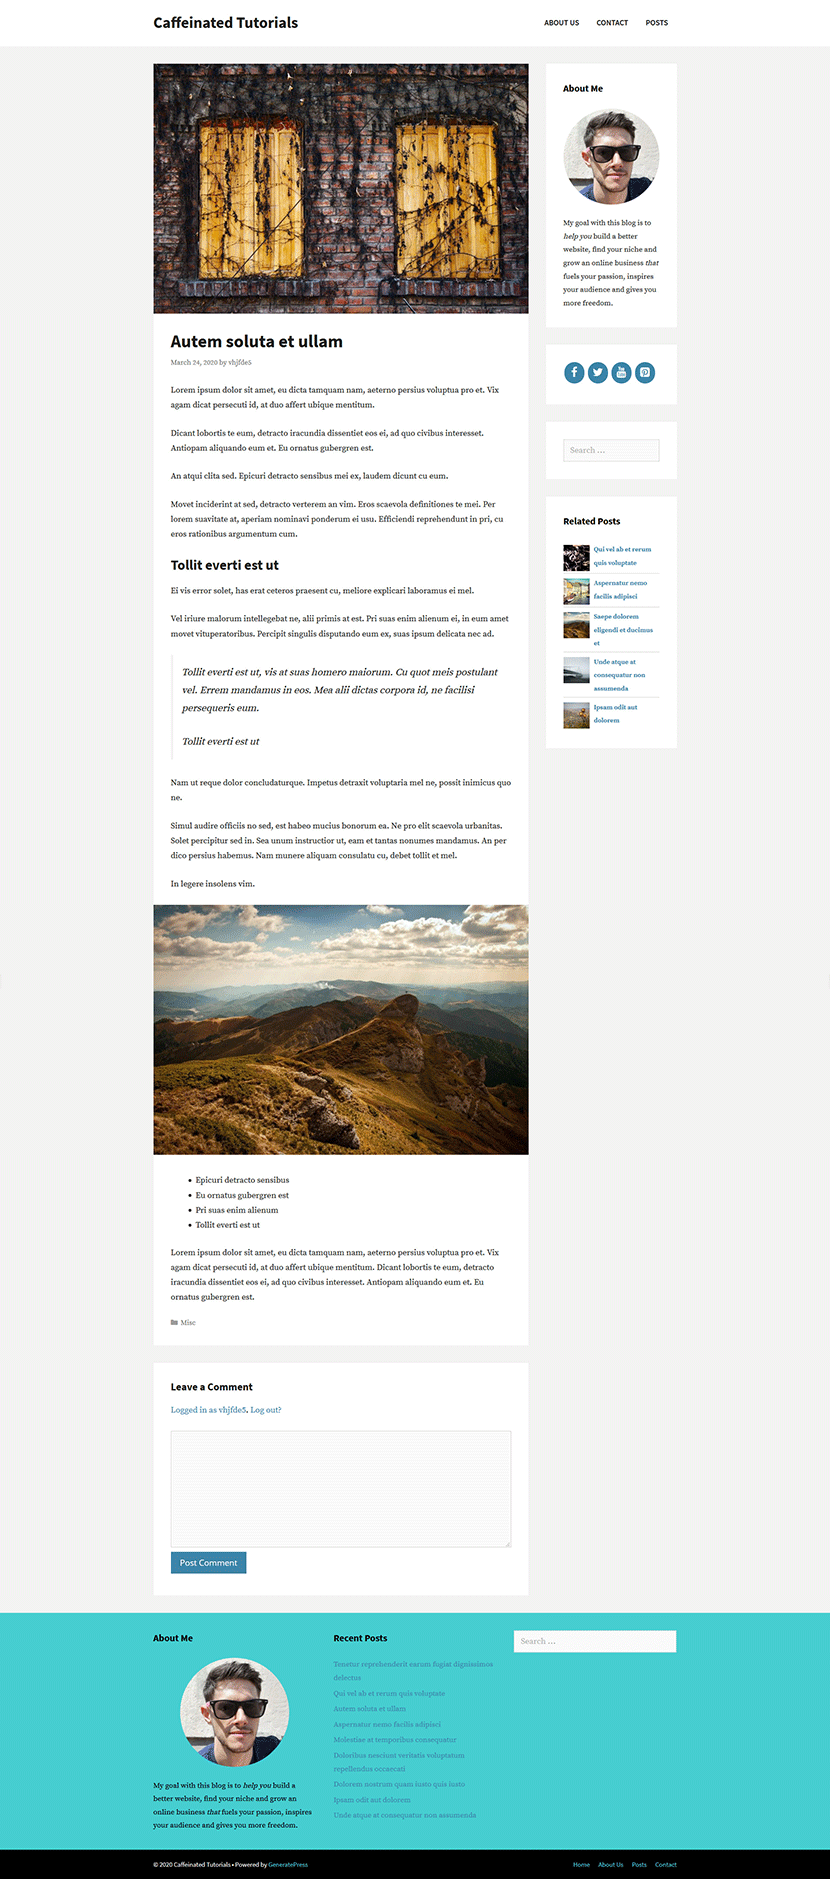
I created this design and layout with GeneratePress, my favorite theme for WordPress.
I’ll have a full tutorial on this blog design coming soon.
Blog Traffic and Income Goals
When you first start a blog or niche website, how are you supposed to know how much effort you need to put into it before you see a return on your investment?
How much traffic is needed to reach your income goals? Or how many blog posts will you need to write to hit your traffic goals?
These are all good question you should be asking when starting your blog.
Luckily, I have created a blog traffic and income calculator to help you answer all of these questions.
All you have to do is put in your income goal and some other stats and it ill do the work for you.
You can find it here. There’s also a video tutorial on how to use it correctly.
The next step is an important one and that’s choosing a niche for your blog. Keep reading to find out why it’s a good idea to niche down.
Why Choose a Niche for Your Blog?
There are thousands of bloggers out there and in every niche imaginable.
Large companies are also blogging and they have large budgets to spend on marketing.
This is the reason why you need to choose a small niche when first starting your blog.
If your niche is too broad, it will take you much longer for anyone to find your blog and for you to start making money.
And that’s what you want right?
To make money with your blog?

Cool!
A lot of people think it’s impossible to make money with a blog because there’s too much competition.
But competition is a good indicator that people are spending money in that market.
If you can grow a big blog in a small niche, you will most likely succeed.
The most important step is to choose a niche that you’re interested in. If you plan on writing your own articles, you’ll soon get bored and give up if you aren’t interested in your blogs topic.
Next, you’ll need to choose a niche that has the potential to make money.
To help you decide on your niche, here’s a great blog post which will also help you validate your niche so you don’t pick the wrong one.
These are some common blog niches you could choose from:
- Fitness and health
- Weight loss
- Online business and digital marketing
- Cooking or recipes
- Coding
- Web design
- Pets
- Tech reviews
And so on.
You want to choose a topic that you have at least some interest in learning about or already have knowledge in.
Now like I mentioned above, these niches are far too broad so we need to narrow it down a bit.
I’m going to use fitness for my example. Sub-niches of fitness could be:
- Jogging/running
- Weight lifting
- Swimming
- Yoga
- Interval training
I’ll niche down from Interval training to “High Intensity Interval Training”.
Let’s say you choose Yoga, you’ll want to narrow yours down as well. So you could narrow it down to something like Vipassana Yoga for instance.
I recommend narrowing down your niche a couple of times so the market you go into isn’t too saturated.
The good thing is you can broaden your niche in the future after your blog has lots of visitors and is making money.
Why?
Because you’ll become an authority in the sub-niche.
So growing your niche from this point will be much easier than starting from here.
I’ll show you a simple trick you can use to find a sub-niche a bit later when we look for some keywords for your blog posts.
Next, I’ll show you how to choose an awesome name for your blog.
Choose a Name for Your Blog
Whenever I need to come up with a new blog name, I’m thinking of a few things:
- Two words that sound good together (usually a noun and an adjective)
- One word should relate to your niche and the other a place, person or thing, e.g hub, go, spirit, life, home etc…
- And the niche word should be broad, let me explain…
You want to choose a domain name that is broad but start the blog in a tight niche.
This will help your blog grow faster in the beginning but you can expand your niche in the future if you ever want to.
Say I choose HiitLife.com, I am limiting myself to blog about HIIT only. I could branch out to other topics like Calisthenics, but the name will be off topic which isn’t great for branding.
My favorite place to find these two words is Thesaurus.com.
I start typing words related to my niche and match it with nouns that go well with one another.
You can also get ideas if you do a Google search for “list of nouns” and “slang words for yourniche”. It’s unlikely that the first name you come up with is going to be available.
For that reason, I recommend getting two big lists of these words (niche words and nouns).
Here are some of the words I tried:
Adjectives (niche related words)
- intense
- intensity
- routine
- quick
- fast
- optimal
Nouns
- go
- life
- core
- focus
- bold
- set
Then I combined them in different ways until I had a list of two words that sounded good together:
- routinefocus
- gointense
- optimalplace
- quickset
- boldroutine
Buying Your Blog Domain Name
Now you’ve got your list of potential domain names, go over to NameCheap.com where you can buy your domain name.
Start searching each name in your list using the search field:
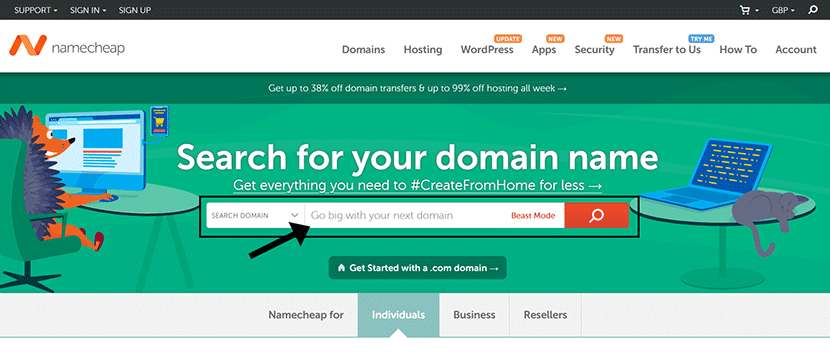
We can see that quickset.com is already taken. Onto the next one…

Wow, gointense.com over £2300!!! That’s over $3000… No thanks!

And if you’re lucky…

Bingo! boldroutine.com is available and I love it! (maybe I’ll use it as a case study one day?)
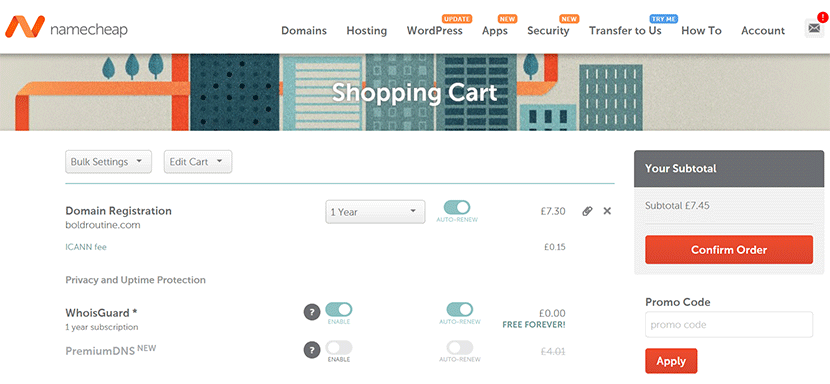
Now, add it to your cart and proceed to the checkout:
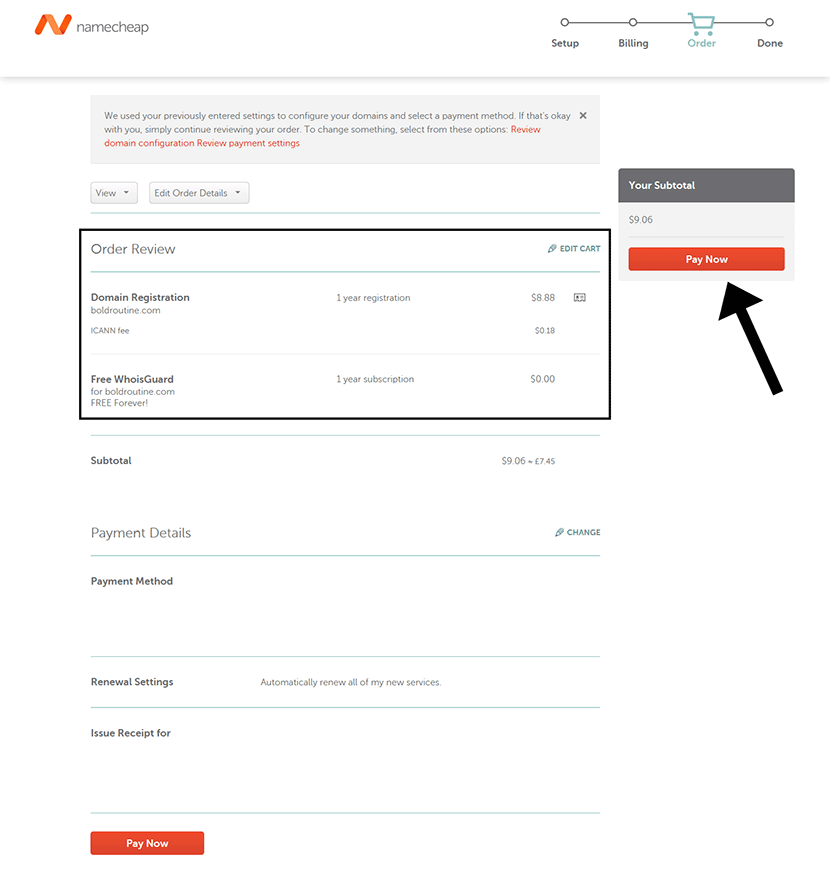
Fill out your details, create an account if you don’t already have one and click Pay Now:
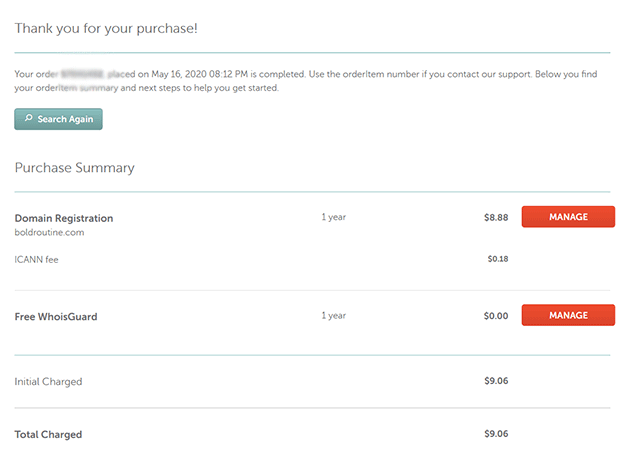
Congrats, you now have a domain name for your blog.
Now that you have your domain name, you’ll want to connect it to your Cloudways account.
Here’s a quick video tutorial on how to do just that and secure it with an SSL Certificate:
It’s time to make your blog to look super clean and professional.
In the next section, we’ll install my favorite WordPress theme, Generatepress.
Why GeneratePress
GeneratePress is a free WordPress theme and there’s a paid addon. But what is the difference between free and paid themes?
Free themes vs paid themes – There are thousands of free WordPress themes to choose from and some of them are great. Although premium themes will give you a lot more freedom to customize the layout and design of your blog. Premium themes are usually more secure because they get more frequent updates. You’ll usually get better support from the theme developer too if you’ve paid for it.
Best WordPress blog theme – GeneratePress is my favorite WordPress theme. The paid upgrade gives you so much flexibility to design your blog anyway you like. And you don’t need to be a designer to design an awesome looking blog with GeneratePress. Whatever you want your blog to look like, you can likely do it with GeneratePress. And if you want a design change in the future, you can do it with GeneratePress instead of buying a new theme. Also, if you want your blog to look like the one above then you’ll need the premium upgrade.
It’s cheaper than most paid themes and you can use it on unlimited websites.
You can buy GeneratePress here.
Installing the GeneratePress theme and premium plugin
To make your blog look awesome, from your WordPress admin, go to Appearance > Themes and click Add New:
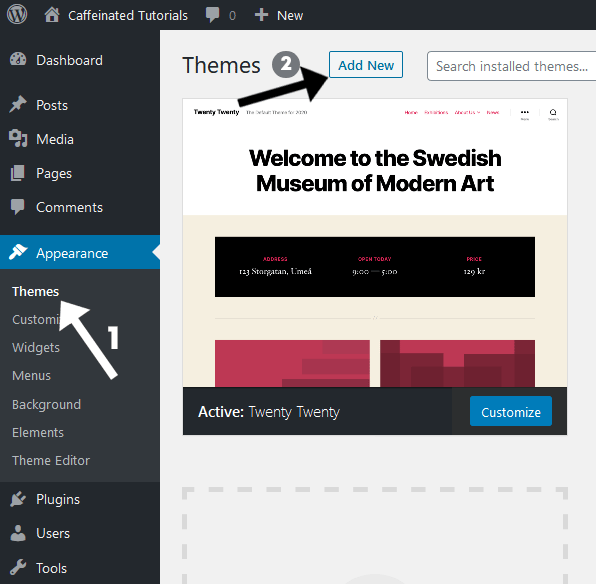
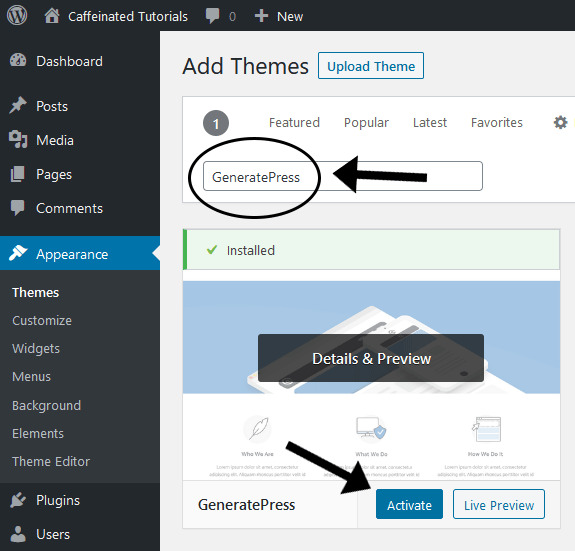
Then in the search bar, type ‘GeneratePress’, then click on Install and then Activate:
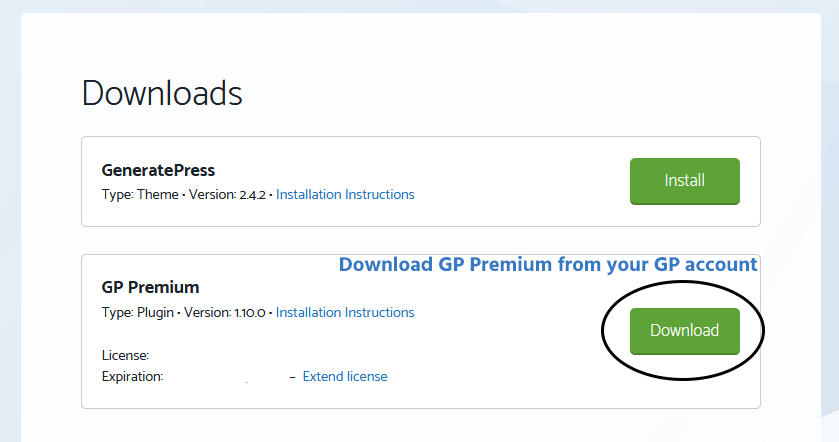
You can buy the premium addon here, download it from your GeneratePress account and upload it:
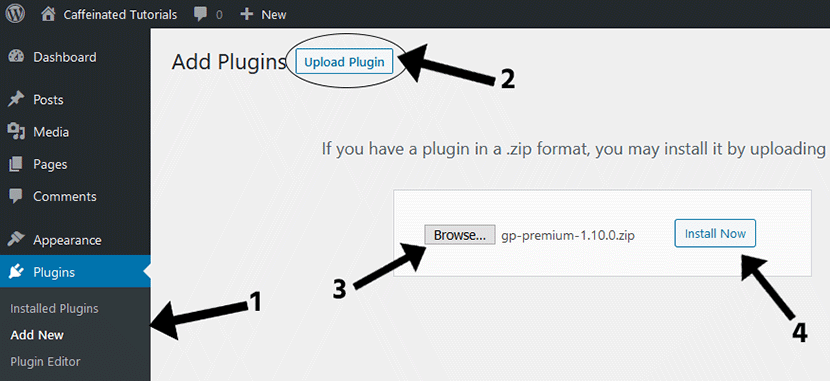
Go to Plugins > Add New and click Upload Plugin. Click Browse and locate the plugin zip file you downloaded and then click on Install Now:
You can buy GeneratePress here.
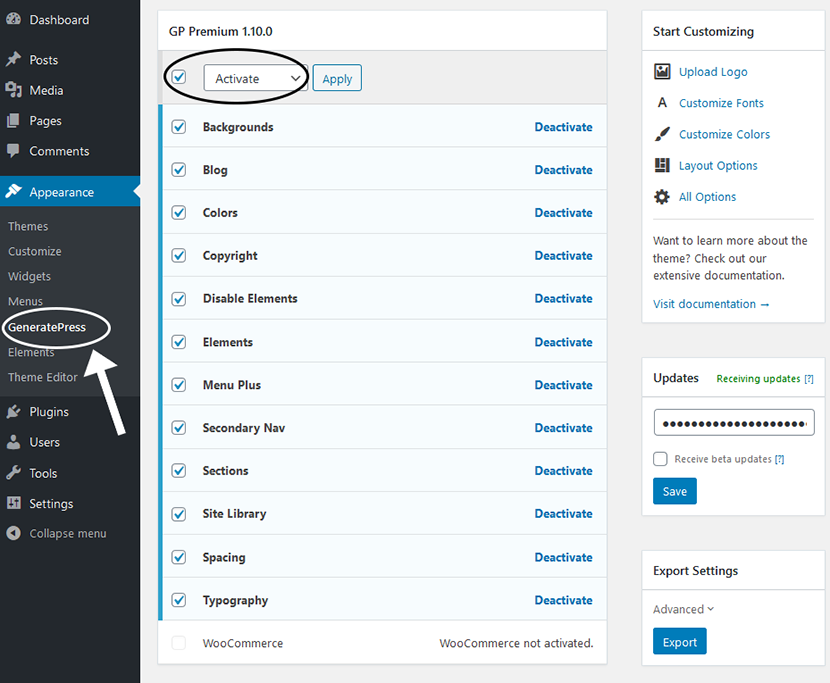
After you install the theme and premium plugin, go to Appearance – GeneratePress.
This page is where you select all the extra features that the premium plugin gives you.
Select the box at the top to select all the addons and choose Activate from the dropdown menu.
Then click Apply: (also, don’t forget to add your GP licence key to get regular plugin updates)
If you can take a look at your home page, you’ll see the default GeneratePress layout:
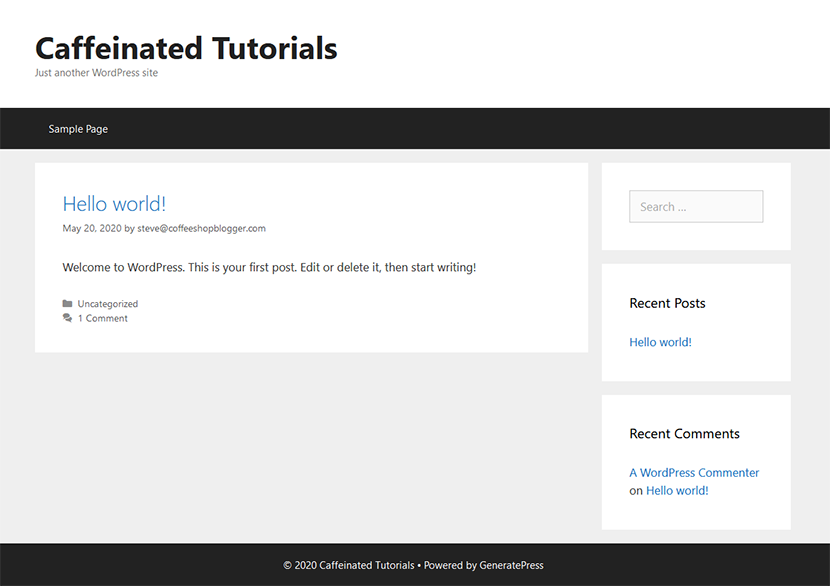
Yeah, it’s pretty dull but not to worry, GeneratePress allows you to do some amazing things.
WordPress blog pages
Let’s first add some pages to our WordPress blog so our visitors can navigate around the website.
The most typical pages for any blog are:
- About Page
- Contact Page
- Start Here
- Privacy Policy Page
- Terms and Conditions
- Disclaimer Page
To create a page, go to Pages > Add New and you’ll see the Gutenberg editor:
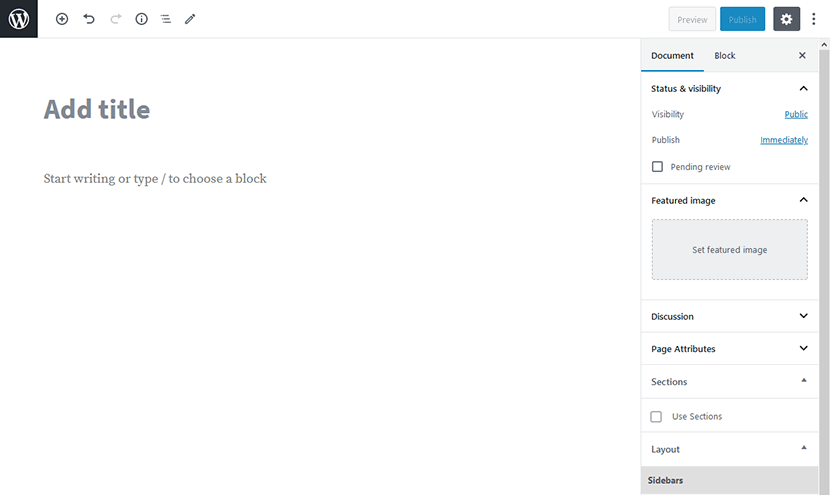
Add your title and then click on Publish. Whatever page you’re creating, you can add your content to it at a later date.
For now, let’s create the pages so we can set up the navigation menu in the next step.
Add site navigation
A navigation menu lets your visitors navigate around your website.
Your menu can consist up of pages, blog categories and custom links.
Once you have your pages created, you can go to Appearance > Menus to create your first menu:
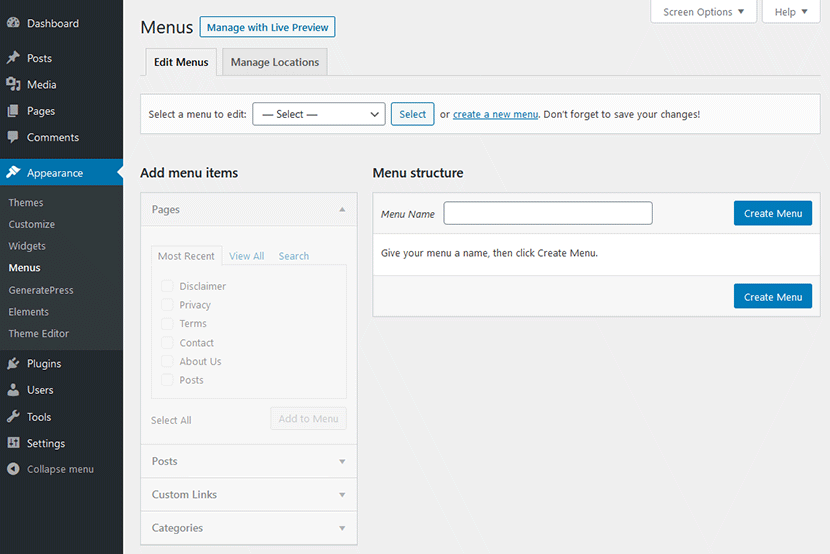
Under Menu Name, type the name of your menu, something like ‘Main menu’ and click on Create Menu.
The next thing to do is check the boxes of the menu items you want from the Pages box on the left and then click on Add to Menu:
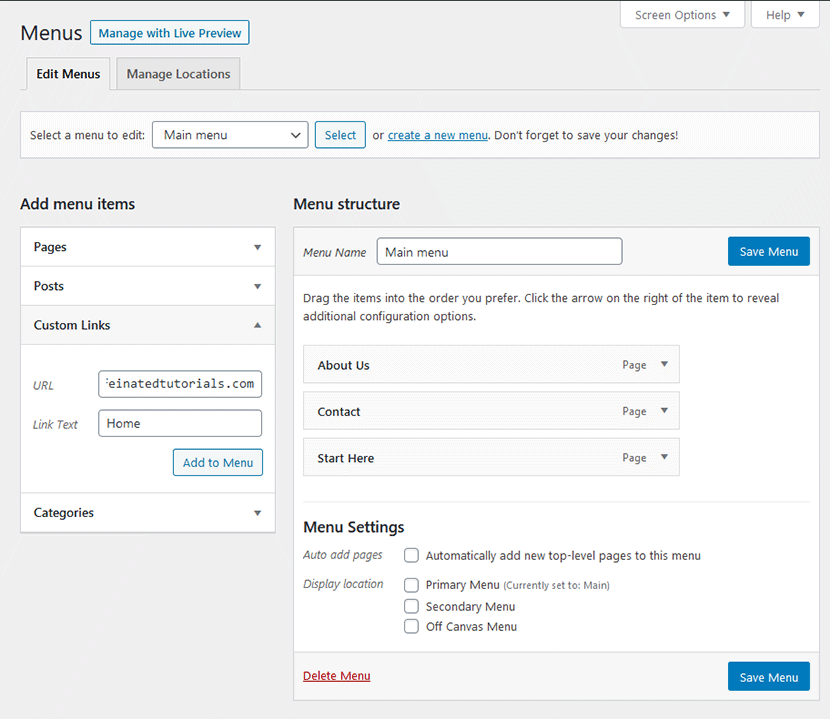
You can also add a Custom Link to the home page of your site like I’ve done above. Once you’ve got all your menu items added, sort them in the order you want and click on Save Menu and you’re done.
Configure WordPress settings
The most important setting we want to change here is the permalinks…
PERMALINKS?
This is the URL structure of the pages and blog posts and the WordPress default isn’t pretty:

You’ll want to make these URL’s more search engine friendly in Settings > Permalinks.
Change the setting from Plain to Post Name and clicking save:
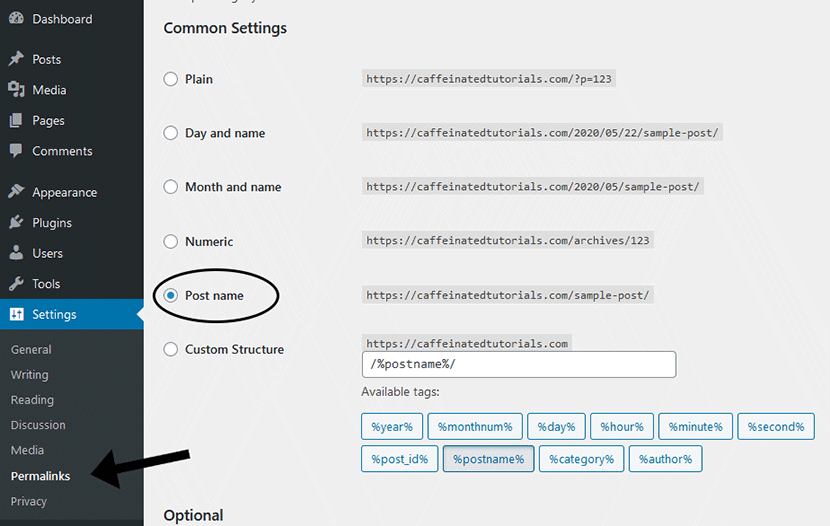
Now we can see that the URL’s look a lot cleaner:

Add sample blog data
The last step before designing your blog is to add some sample content. You don’t have to do this step but it will give you a good idea of what your blog will look like with actual blog posts on it.
You can do this with a plugin called FakerPress. Use this plugin to add a bunch of dummy articles to your blog so you’re not working with an empty blog.
GeneratePress Theme settings
To start changing your blogs design, go to Appearance > Customize:
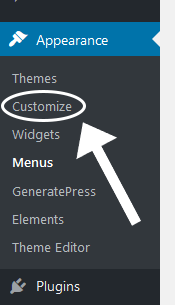
This will open up the homepage of your blog and a sidebar with loads of options:
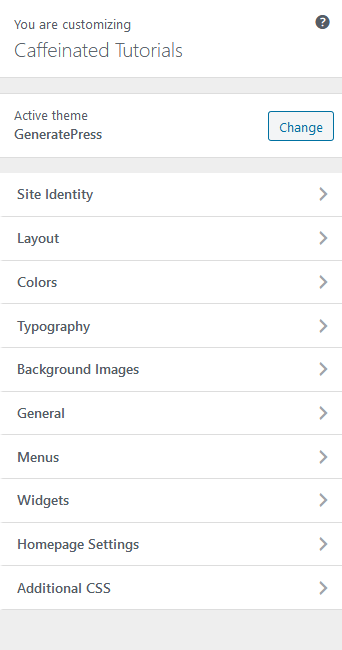
From here, you can go into each of these settings and customize every aspect of your blogs design and layout.
There’s so much you can do here and it might get a little overwhelming if you’re seeing this for the first time.
I’ll be publishing some in depth articles and video tutorials very soon.
If you can’t wait tho and want to get stuck in, go ahead and get familiar with these settings and see what each of them do.
You could take advantage of the GeneratePress Site Library. This lets you choose a ready made template and it installs the settings for you.
Head over to Appearance > GeneratePress and then click Site Library:
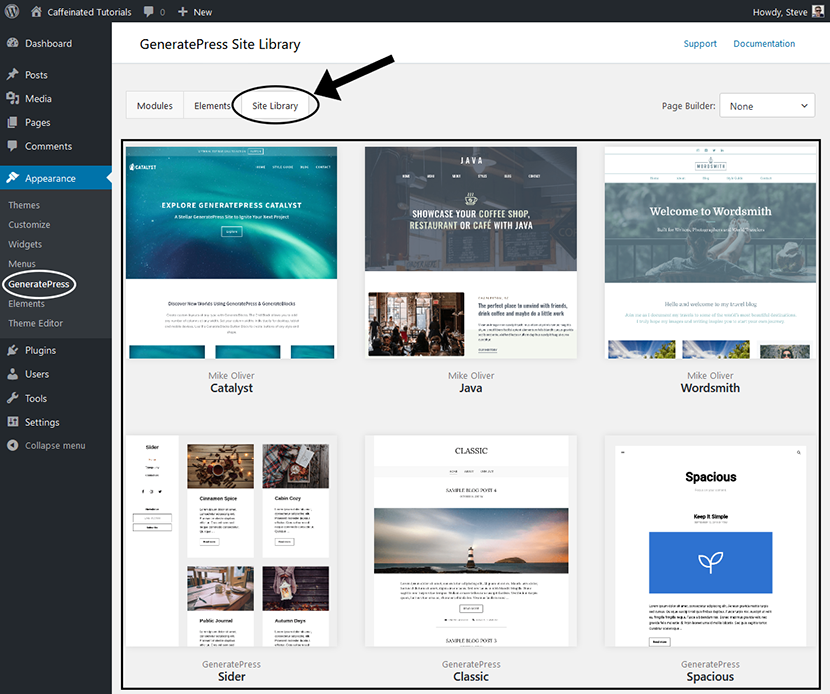
You’ll see this page with several templates for you to choose from. Hover over one you like and click preview to preview it or details to install it on your site.
To install your chosen template, check the box and click backup options:
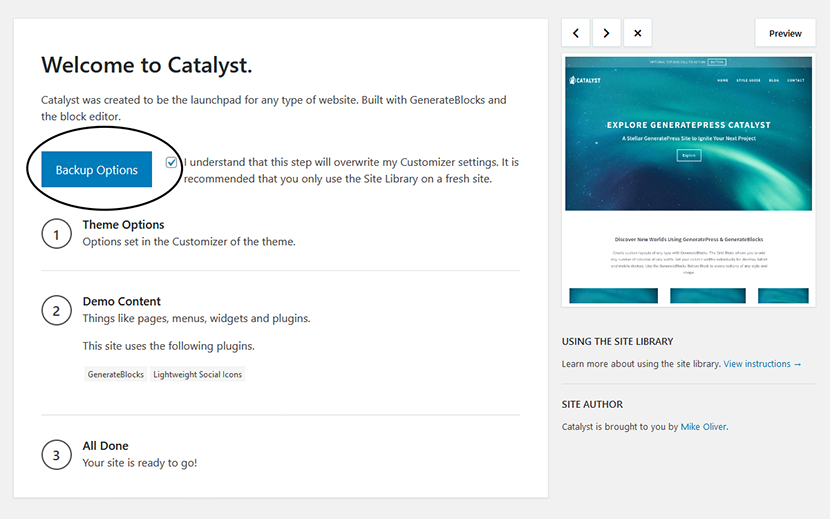
Then after you download a backup of your site, you can import the options for this template.
You then have the option to import content and some extra plugins that the theme recommends.
Once everything has imported, your new design will be complete:
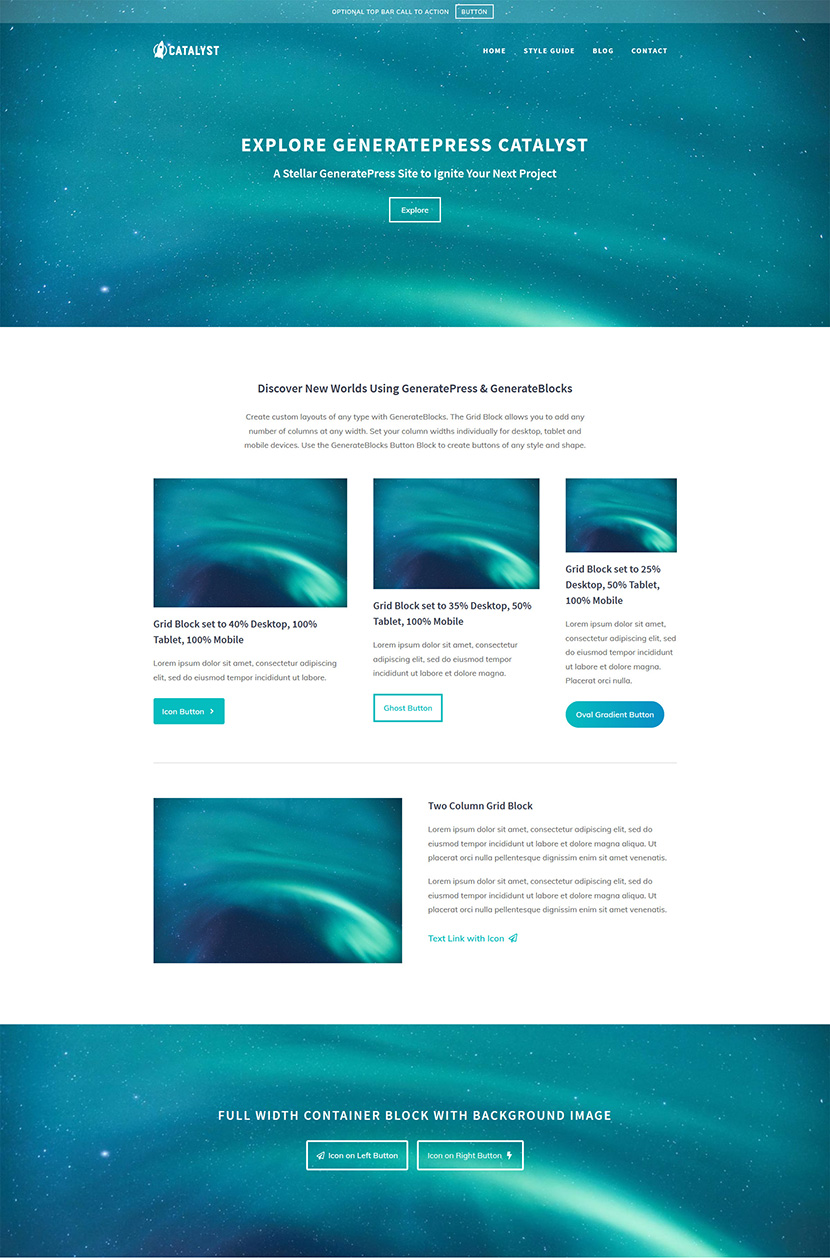
Stay tuned for some upcoming blog design tutorials. I’ll be posting them to my YouTube channel so make sure you’re subscribed.
How to Create Your First Blog Post
A blog wouldn’t be a blog if you didn’t have any blog posts on it. And I’m going to walk you through everything you need to know to research, write and publish your first blog post.
Let’s get started.
Finding relevant blog topics
To start writing your first blog post, you’ll first want to find a relevant topic to write about.
I need to find something to write about for my niche – High Intensity Interval Training.
A great way to do that would be to look for books on Amazon.com and take a look at the Table of Contents.
Head over to Amazon and search for a book and click Look inside:
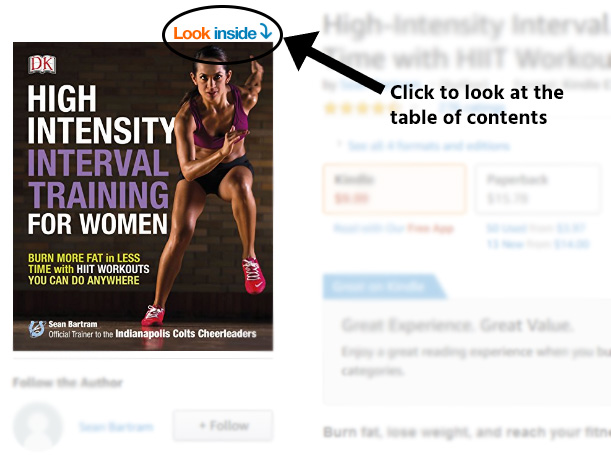
And I can already see a few topics I could research:
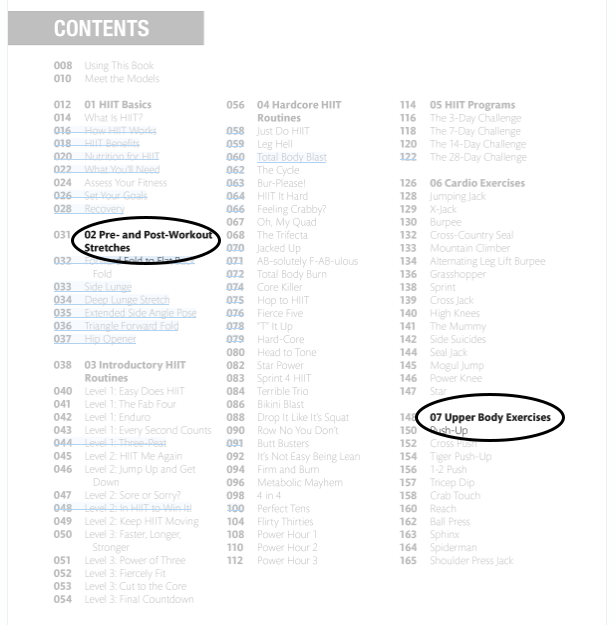
- HIIT workouts
- HIIT stretches
- HIIT exercises
Any one of these would be a good starting point as a topic for a HIIT blog.
Find a Good Keyword
Earlier I mentioned a way you can narrow down your niche so you aren’t competing with huge sites in your market.
Keyword research is great for this.
You can find a sub-sub-niche in your main niche and find good keywords (or keyword phrases) for your blog posts.
Good keywords are those with decent volume but low competition. Volume means how many times the keyword gets searched for in Google per month.
And low competition means you aren’t competing with too many blogs for the same keywords.
To find some good keywords, let’s use a free tool called Ubersuggest.
Go to ubersuggest.com and search for your chosen niche:
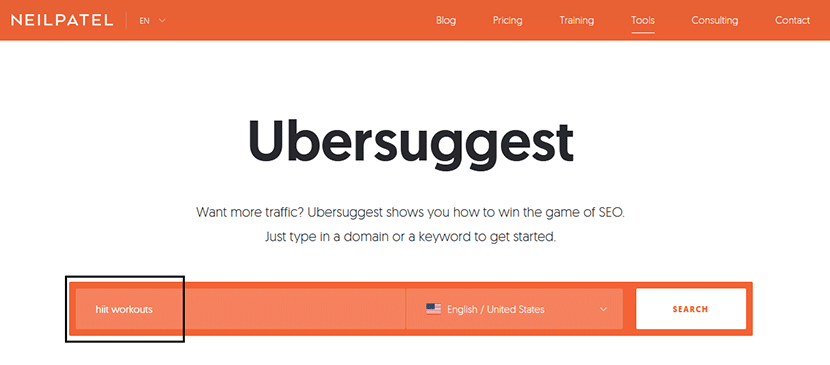
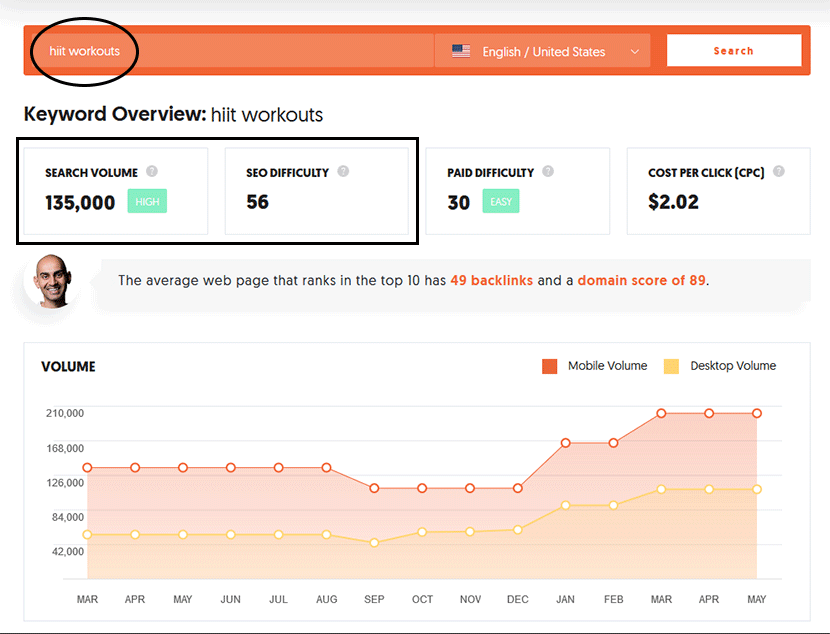
I can see that my keyword search volume is 135,000 searches per month which is crazy high. And the SEO difficulty is 56 which will be way too hard to rank for with a new blog.
Scroll down to see keyword ideas and look for a keyword with less search volume.
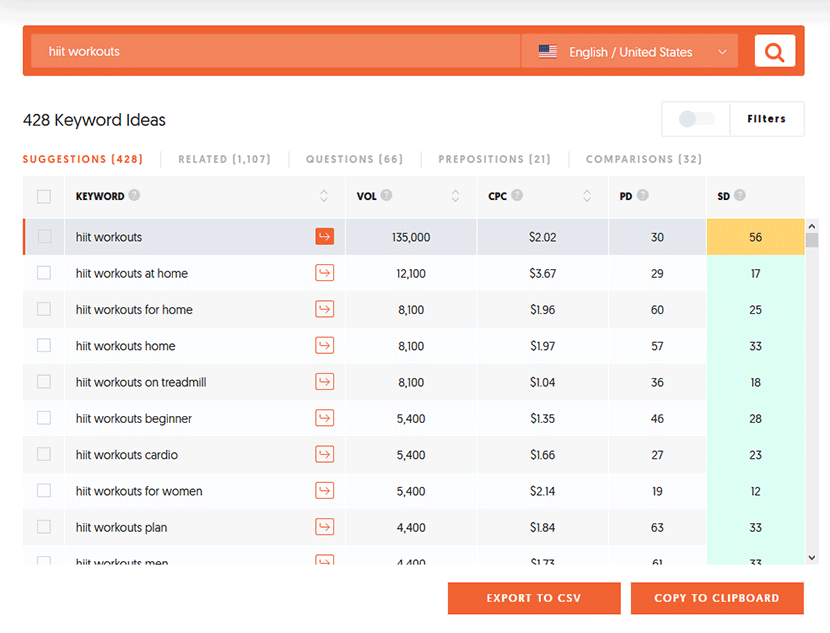
Here’s one I found with way less search volume and only a 14 SEO score:
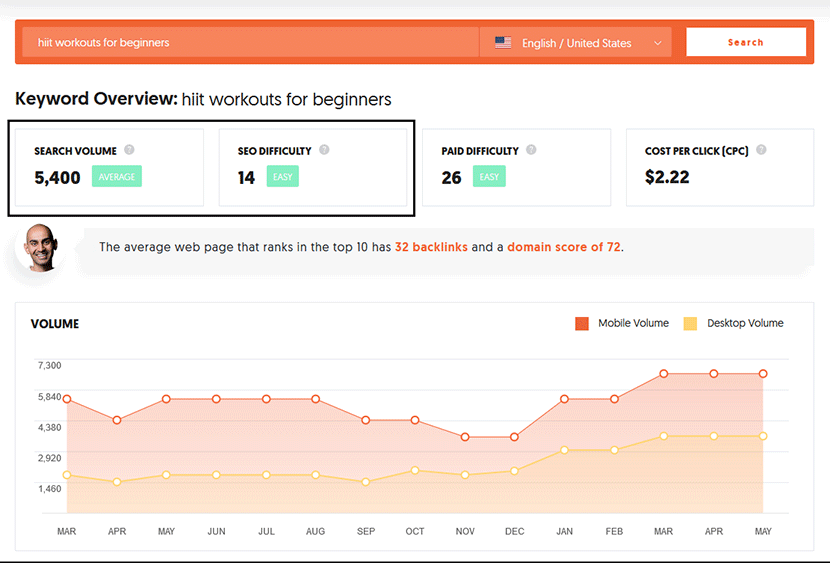
This keyword will be much easier to rank for because it has less search volume.
Which means there will be less websites and blogs going after the same keyword.
If I focus my example blog around this topic, it’ll grow much faster because it’ll become an authority.
What if you need help finding a sub-niche?
Let’s use a tool called KWFinder to find some more keywords and narrow down the niche ‘yoga’:
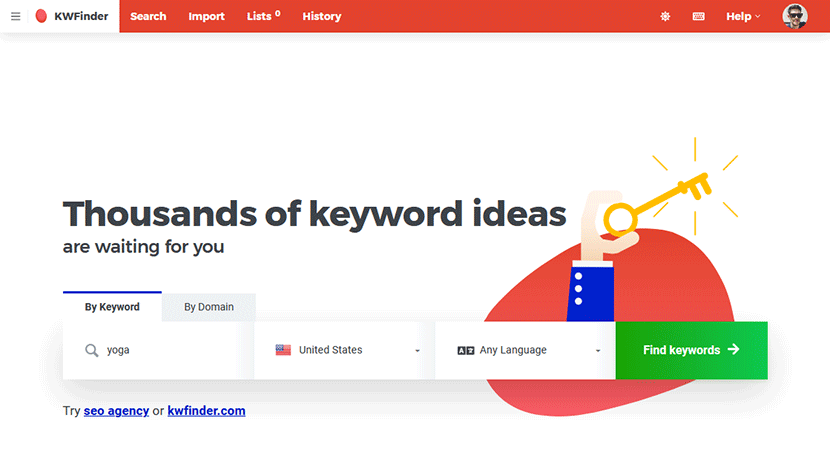
KWFinder is a paid tool packed with powerful features. It will help you find tonnes of related keywords for your blog posts.
You also get a few free searches so you can see how it works before you buy a monthly plan.
Take a look at this list of related keywords for ‘yoga’:
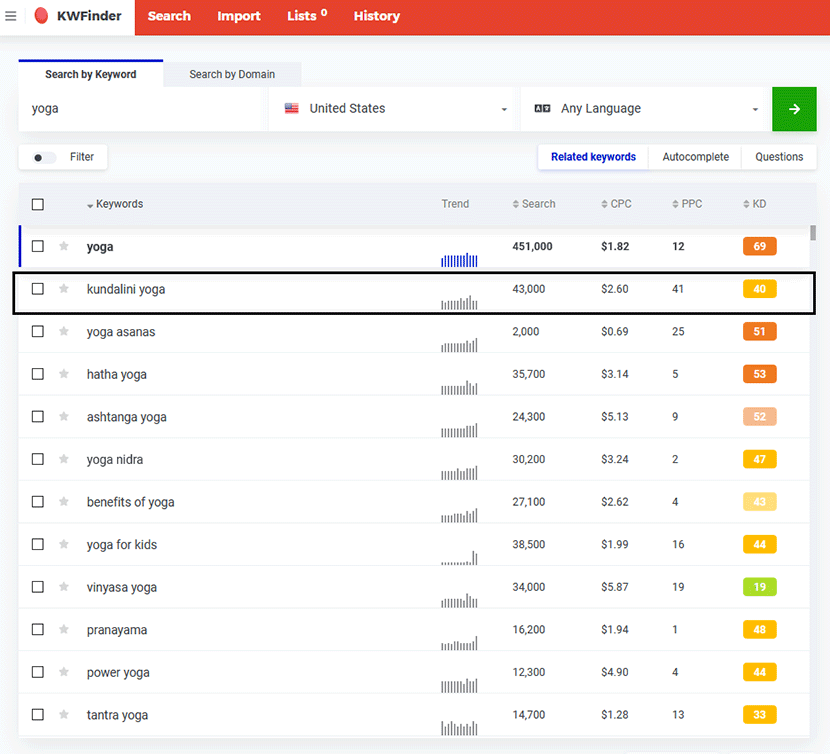
This niche would be way too competitive as we can see it has over 450,000 searches and the KD (keyword difficulty) is 69.
Kundalini yoga still has a large amount of search volume but the KD is a lot lower 40.
This could be the perfect sub-niche to start a new blog in.
Now, to find some keywords you could use for your blog posts, click ‘Search related keywords’:

But we want to find keywords with both of these words so we’ll use the filter:
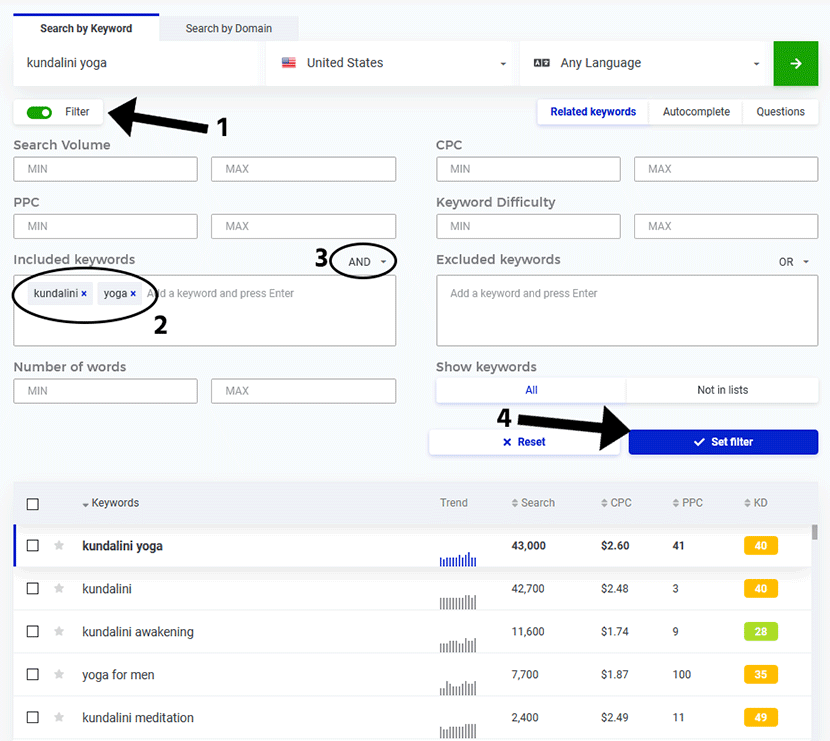
Click Filter, type in both keywords you want the results to show, change OR to AND and then click on Set filter. You should now have a list of related keywords that contain both words ‘kundalini’ and ‘yoga’:
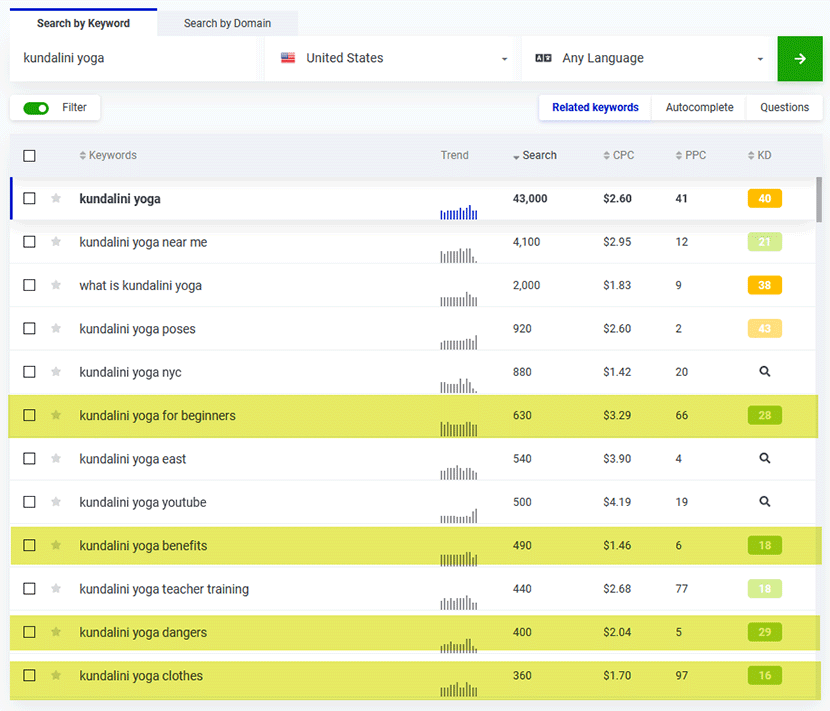
Now you’ll have a list of potential keywords that you can use for blog posts. You can change the sort order to list the highest search volume keywords at the top by clicking on ‘Search’.
Aim for keywords with a search volume between 100-1000 that have a KD score of lower than 30.
That way, you won’t be competing with keyword phrases that have too much competition and hard to rank for.
Write your blog post
Now you know how to choose a great topic and find a good keyword, it’s time to start writing your blog post.
This is the part most people get hung up on. They get so overwhelmed and don’t know where to start.
All you can do is get started, focus on one thing at a time and try not to worry too much about the outcome.
Here’s a framework you can follow to get started writing your first article:
- Use one of your keywords as the main idea for your blog post
- Open up a word document or something like Google Docs and write a potential title
- Use The Classic List Post here as this is one of the easiest types of articles to write
- Write an outline breaking down each point you want to make with subheadings
- Write in a conversational way, like you’re talking to a friend
- Aim to write 1000 – 1500 words
Here’s a great example blog post: 10 Best Guided Chakra Meditations for Beginners.
This example post is a simple list of YouTube videos with a summary of each video. An article like this would be quite easy to replicate and you could even make yours better.
Once you’ve written several articles, you’ll get the hang of it and be able to write faster.
You can then move onto other templates to broaden the type of content on your site.
Edit your blog post
If you’ve spent anytime reading blog posts online then you’ll know what a good and bad blog post looks like.
Landing on a page with huge blocks of text and nothing else is a sure-fire way to scare off your readers.
That’s why it’s important to break your content up:
- Using subheadings
- Bullet points
- Images
- Quotes
- Tables or notice boxes
Breaking up the text like this will make it easier for your readers to digest the content.
And if your content is easier to read, people will stay on your blog for longer and share your posts on social media.
To find images for your blog posts, you can use royalty free image sites.
There are many of these sites you could use for your images, but the one I use the most is Pexels.
Head over to Pexels.com and search for a relevant image:
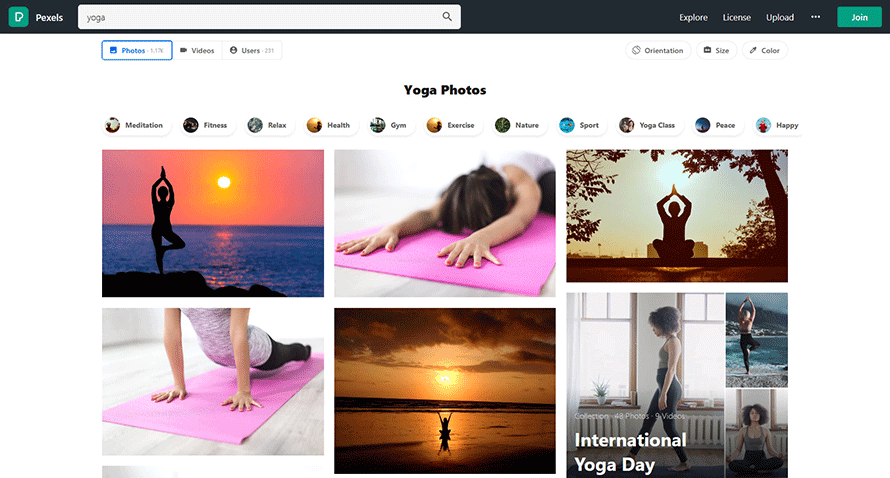
Download some images and use them throughout your content.
Breaking up your blog posts like this will keep readers interested.
Publishing your blog post to WordPress
Once you’ve finished writing your first blog post, all that’s left to do is post it to your WordPress site.
Go to Posts > Add New and you’ll see this page:
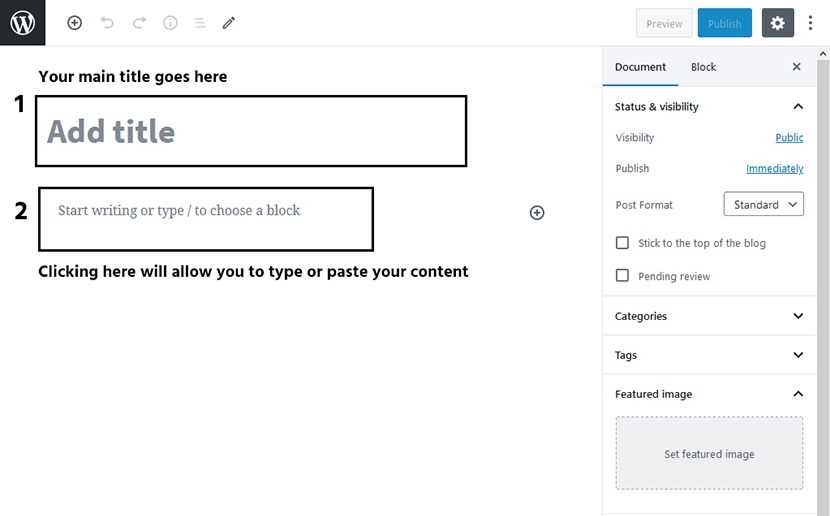
Add your main title and start writing your blog post.
Or you can paste your content if you wrote it somewhere like Google Docs.
In the WordPress editor (Gutenberg), you can select different elements called blocks.
Click on the small plus icon either at the top of the page or to the right of where it says ‘Start writing’:
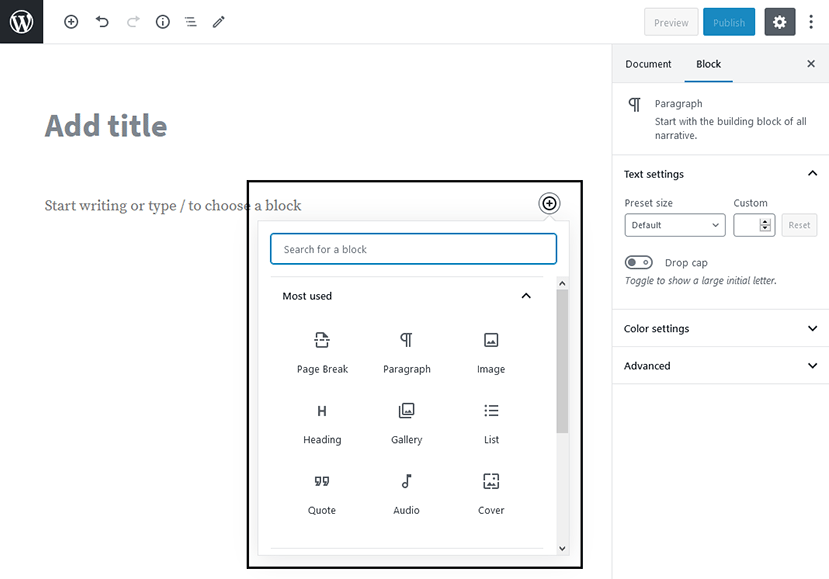
This is where you can insert images, headings, quotes and bullet points into the Gutenberg.
Once your blog post is complete, you can include a featured image on the right sidebar and choose a category.
Then click Publish:
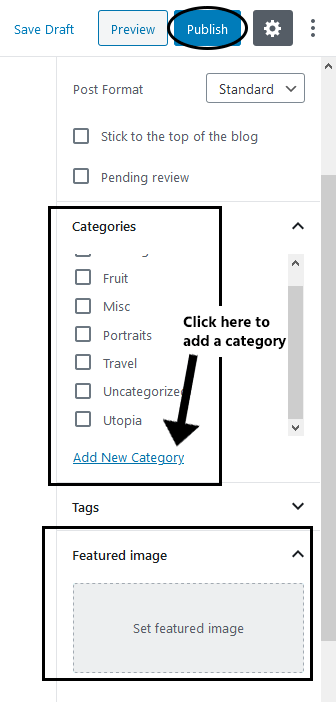
Congrats, you published your first blog post!
WordPress Blog Plugins
There’s thousands of free and paid WordPress plugins to improve your blog.
But what are these plugins and why do we need them?
What are WordPress plugins?
WordPress plugins add extra features to your blog so you can get more use out of it.
Some plugins are free and some have the option to upgrade to a paid version which have more features.
Whether you want to add a simple photo gallery or create an entire social network, there is a plugin that can do that.
How to install a WordPress plugin
To install a WordPress plugin, go to Plugins > Add New:
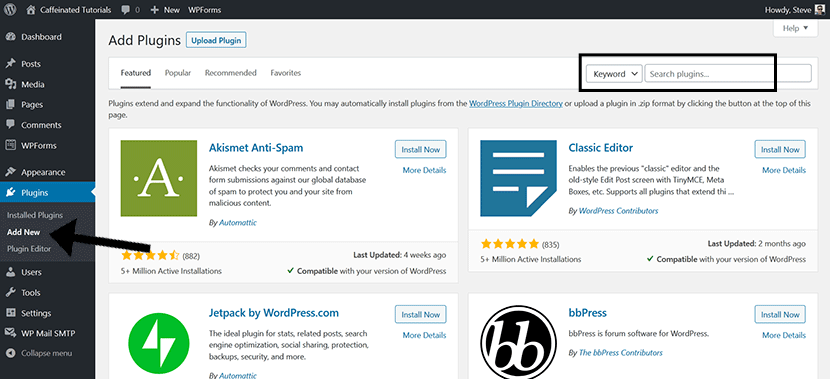
You’ll see this page of featured plugins which you can browse through by clicking the options at the top.
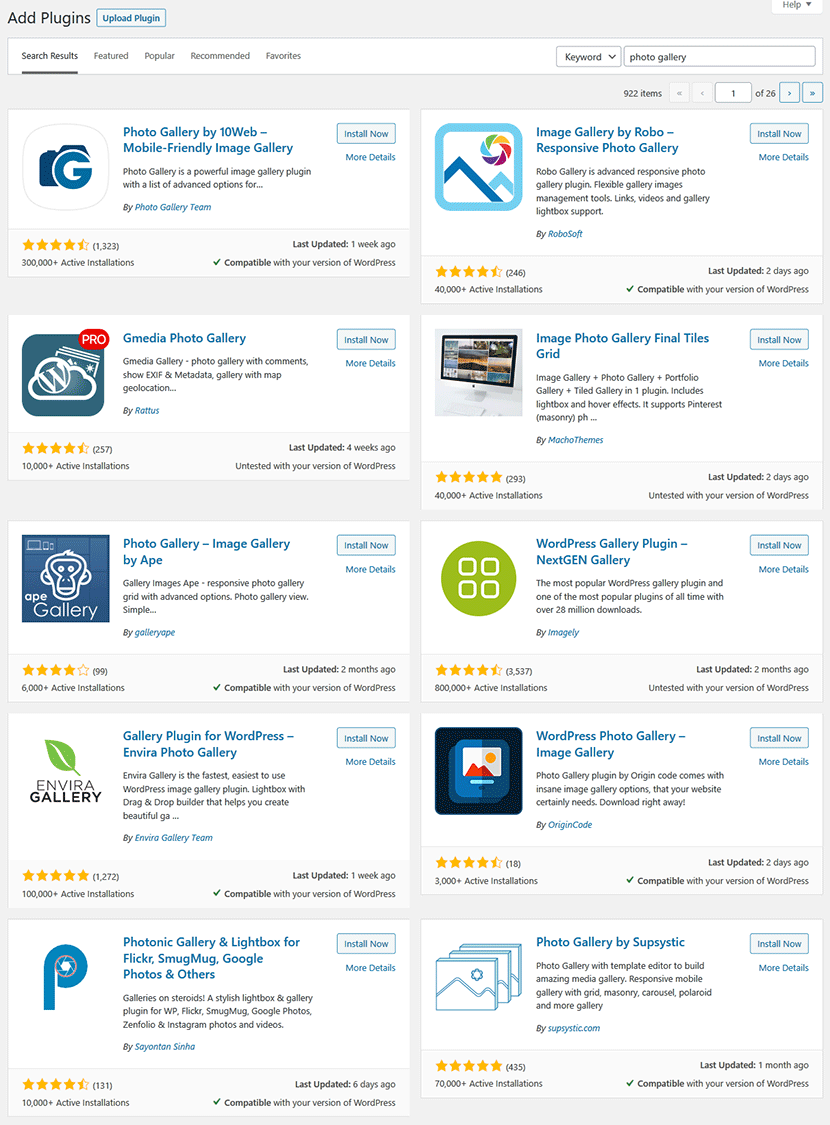
The best way to find a plugin or feature you want is to search for it. You can search on Google or search inside the WordPress admin.
To search inside WordPress, use the search box and a list of plugins will display matching your query:
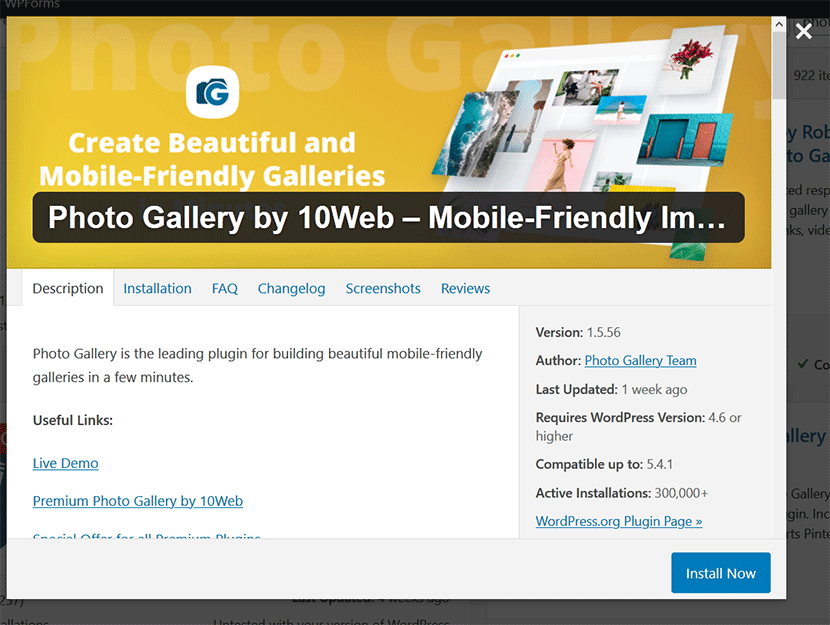
Then when you’ve found a plugin you want to use, click on Install Now. You can also check the details of the plugin if you want to read more about what the plugin does:
Once you’ve installed the plugin, click on Activate. Most plugins will create a settings section in your WordPress admin:
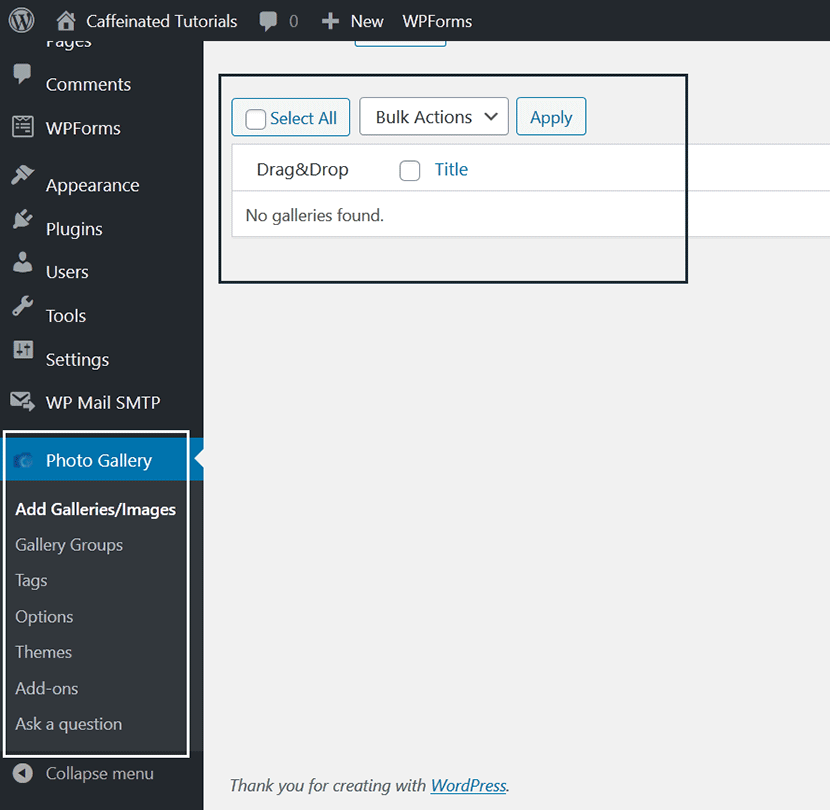
Now you can play around with these settings to see what options are available for that plugin.
5 Must-have WordPress Plugins for your blog
Plugins are great for extending the use of WordPress as and when you need them.
Here are some plugins that you should consider installing straight away.
Here are my top five WordPress plugins for new bloggers.
- SEO Plugin – an SEO plugin that optimises your blog to help it show up in search engines like Google. Yoast SEO or RankMath are great options.
- Social share buttons – enables your readers to share your blog posts on social media. I like the plugins Social Warfare or Bloom by Elegant Themes.
- Related posts widget – a sidebar widget which shows related blog posts. This can help with user engagement.
- Anti-spam plugin – stops you from getting spam comments on your blog posts.
- Social network icons – place social media icons on your blog so people can follow you and your blog on social media.
Look out for some videos tutorials of these plugins and more coming very soon.
How to Monetize a WordPress Blog in 2021
Can you really make money blogging?
Yes, you can.
Thousands of people have turned to blogging as a means to make extra money on the side.
And many of those people make huge amounts.
It’s a very lucrative business and there’s always room to make money online as a blogger.
If you follow the steps in this blogging guide, you too could be one of them.
How much money can you make from your blog?
Most people who start a blog don’t make any money because they give up when they don’t see money after a few weeks.
If you don’t write enough content for your blog, then you won’t get enough traffic.
And you need traffic to make money.
But how much do bloggers actually make?
If you do a search on Google for “blog income report”, you’ll find many case studies of bloggers making money.
Here’s one income report by Ryan Robinson who made $28,387.79 in March 2020.
3 Best ways to get started making money with your blog
There are many ways to make money with your blog, but here I’ll share three common ways you can get started.
- Affiliate Marketing – one of the easiest ways to monetise a blog. This is where you promote other companies’ products and make a commission on the sale. You’ll want to choose a niche that has a lot of products to recommend. That way, you’ll be helping your audience find a solution and making money in return.
- Ads – they’re all over the internet because they work. Businesses need visitors and they’re willing to pay for them. Bloggers can place these ads on their website and make a small cut of the ad revenue when the visitor clicks on them. Ad networks such as Google Adwords are easy to set up. You’ll need a lot of traffic to your blog though before making decent money. Affiliate marketing is often a preferred option for beginner bloggers.
- Digital downloads – ebooks and online courses are a great way to generate blog income. They will usually generate the most revenue because the entire sale goes to you. But with high profit margins comes more of a learning curve to master.
Conclusion
This post outlines the steps involved to start a blog and make it a success.
The steps are easy to follow but to stick at it you’ll need a lot of commitment, determination and courage.
My advice is to start with the very first step and take your time.
Make the decision to become a blogger, learn the steps involved and take some action everyday.
As long as you persevere and keep learning, your blog will be a huge success.
Now I want you to hear from you.
Comment below if you’re starting a blog in 2021 and let me know if you have any questions.
Thanks steve ! such a great post. I agree that generatepress is blazing fast theme.
Nice 🙂🙂🙂🙂👍👍👍